Archive for September 2013
How to Transfer Blog From One Account To Other Account
This is very common issue, facing lot of people. But now it's very easy to transfer your blog from one account to another.........
Sign in to your current G mail account on which u made your blog.

Sign in to your current G mail account on which u made your blog.

- Go to your Dashboard And then select Settings. On settings Select "Basic".
- On which select Permissions, and then select add Authors. And there enter the G mail id of that you want to transfer your blog.
- And then Select on invite authors.
- Then log out from your current G mail id and log in to your other G mail id , On which you want to move your Blog.
- After log in there is E mail notification, Click on Accept invitation.
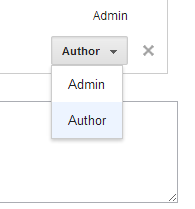
- After accepting invitation, log out and then log in to your previous id and then select Settings, Basic
Permissions. And then change your new G Mail id as admin. as shown in below. - And selected Id to Admin.
- And now there successfully you transfer your blog.
Tag :
Blogger,
Transferring Blog
How To Post in WordPress
In my previous post i wrote about sign up in word press. And now i show you how to post in word Press.


>How to make your post worthy ?
> How your post will be top on all search engines ?


Title of The Post :
- First of all select a unique title for your post. And the title of your must be match with your post contents.
- Post title is shortly described all about your post.
In this section you write all about your post contents. You can see a little menu on the top of Post body section. I described all the options, which you can use :
- Add Media

From This you can insert images on your post. You can also create gallery(collection of images).
WordPress provides you a free space of 3 GB, you can upload and save your contents. But in free trial you can't upload a videos. To uploading videos you have to buy it's paid version.
- Add Poll
If you want to add poll about your post, then WordPress provides you an option to add poll on your post.
It's like an Facebook poll, e.g on Facebook when we have to know about our audience views then we made a poll same here in WordPress.

- Add Contact Form

If you want to add a contact form on your post then you can also add a contact form. From add contact option.
- Menu Bar
Below the buttons there a menu bar from which you can edit your post contents.You can make a word bold, italic etc. you can also link your page or word with others pages with link option.
I hope this post'll help you......
Tag :
WordPress
Difference between Binary Search and Linear Search
 There are lots of searching methods in an Array. But i compare Linear Search with Binary Search here.
Linear Search:
Linear search is a very common method to search a number in array. In linear search , if there is 'n' numbers then we have to do 'n-1' comparison to search a particular number. It's a worst algorithm. The algorithm of linear search search a number at every index on array. For Example if there is a number on 9th Index, then first it check at index 1 then index 2 and vice versa. After 8th comparison we got our result.The Program of linear search is as :
#include<iostream>
#include<conio.h>
using namespace std;
int main()
{
int i,time=0,num,found=0,loc;
int a[5];
for(i=0;i<5;i++)
{
cout<<"Put the value of numbers:"<<endl;
cin>>a[i];
}
cout<<"Enter the num which we want to search:"<<endl;
cin>>num;
for(i=0;i<5;i++)
{
time++;
if (a[i]==num)
{
found++;
loc=i;
break;
}
}
if(found==1)
cout<<"Number is found at:"<<loc<<endl;
else
cout<<"Not Found"<<endl;
cout<<"Your total time is:"<<time<<endl;
getche();
}
Binary Search:
The algorithm of binary search is much complex as compared with linear search. But it is a quick method to search a number in an array. If we find a number from an array of length 50, then we required our number at least after 6 comparisons.Binary search is applicable for only sorted array. You can't search a number from Binary Search in an unsorted array.
The basic algorithm of binary search is that, we firstly find a mid location of an array.
mid=beg+end/2;
After that we check that either a required number is greater than or smaller than mid location number. If the number is smaller then we move our end point at mid-1, and ignores the list which is greater than that of number.From that our list become half and then we repeat this method even that we not find the number.
#include<iostream>
#include<conio.h>
using namespace std;
int main()
{
int top,num,mid, bottom,flag,loc;
top=1;
bottom=9;
flag=0;
int arr[10]={1,2,3,4,5,6,7,8,9,10};
cout<<"Enter the number \t";
cin>>num;
while(top<=bottom && flag==0)
{
mid=(top+bottom)/2;
if(num<arr[mid])
{
bottom=mid-1;
loc=mid;
}
else if(num>arr[mid])
{
top=mid+1;
loc=mid;
}
else
{
flag=1;
loc=mid;
}
}
if(flag==1)
{
cout<<"Number found at loc \t"<<mid;
}
else
{
cout<<"numnber not found";
}
}
Tag :
C plus
First Step Towards WordPress
.jpg)
Now a days, WordPress are becoming more popular in the world. Mostly, beginners start their web development career from this. It provides a very easy technique to develop their own blog. Most of WordPress templates are available, from which you can made anytype of blog e.g. Education, Sports, Programming, News, Fashion, Magazines etc. Everything is available on WordPress.
Now i gave you a little introduction about WordPress. How to start ?
Step 1: Sign Up

From there you can sign up. First step towards web development.
- Click On Get Started.
- After That Enter your permanent email address
- Enter username and password
- And Then enter your blog address which you want to make. e.g
itnewgadgets.wordpress.com - Then Click On Create Free Blog.
- After clicking it sends you an email on your account. It's confirmation of your account. Open your account and click on activate blog.
Step 2: Set Up Blog:
- Enter Your Blog Title, it's also called Header.
- Then enter a little description about your blog.
- Then Select language and click Next.
Step 3: Choose A Theme:
- Now select a theme according to your blog. e.g i selected a "twenty eleven" theme for my blog.
- Click Next
Step 4: Share your Blog Posts with family, friend:
- Then select any option either Facebook or twitter or both to share your blog posts
- Now click next
Step 5: Create Your First Posts:
- Click On finish
- Now your Blog is ready to put some posts on it.
Step 6: Seeing Your Blog:
- From above menu click on my blog.
- then select your blog, your blog is open, and the theme which is you selected apply on to your blog.
Tag :
WordPress
How To Hide a File Behind An Image

In order to do this firstly you have quite knowledge of command prompt
1. Select an image which you want to use in file hiding.
2. Now select a file which you want to hide behind an image and make it in .RAR format. With the help of the WinRAR.
3. And most important is that paste both the files on desktop. You may do this anywhere instead of desktop if you have some basic understanding of command line.
4. Now open cmd by going to Start > Accessories > Command Prompt and type following commands in it.
5. CD stands for change directory by typing above command you change your directory to desktop. After that type command given below.
Copy /b imagename.jpg + filename.rar finalimage.jpg
Replace imagename.jpg with the name of image you want your file to be hidden behind. Don't forget to add image format (Eg: .jpg,.png,.gif)
Replace filename with name of your file you want to hide. It must be in .rar format.
Finally Replace finalimage.jpg with whatever name you want your final image with hidden files should be. This is the image where your file will be hidden.
6. Now when you will try to open this newly created image it will open as normal image, but to open you hidden file you need follow steps given below.
How To Access Hidden File ?
To access your hidden file you need to open the newly created image in winrar. Just follow simple steps given below to do that.
1. Open winrar
2. Now locate your image and open it or simply drag your image in winrar.
3. Extract the file and done.
Tag :
Amazing Tricks
String Tokenization
It is the process of dividing a string into sequences
of contiguous characters separated by any of the characters that are part of
delimiters.Basically tokenization word is derived from word "Token".
Token means a little part. For example if there is a string like that,
string st[]={"Programming Is Everything"};
Then if we divide a string into its parts like that
Programming // This is called a Token
Is // This is called a Token
Every thing // This is called a Token
The function which is used for this is "Strtok(sentence, " ")"
Here a simple program which can help you to understand this.
Program:
#include<iostream>
#include<conio.h>
#include<string.h>
using namespace std;
int main()
{
char arr[20]={"This is my book"};
char *ptr=arr;
ptr=strtok(arr, " "); // if there is a comma Between a sentence then we use a ","
cout<<ptr;
while(ptr!="Null")
{
ptr=strtok('\0', " ");
cout<<ptr<<endl;
}
getch();
}
Tag :
C plus
Defining a Class In structure
.jpg)
We simply can define a class in a structure and also structure in class. When we define a class in a structure, then class become a member of the structure. And we can access a class in main function by using ''dot(.)'' operator.
A very simple example is here from which you can easily understand.
Example:
In this example i define a structure and in the structure i also define a class with its public and private data member. As i know that in class we can't directly access the private data member, that's why i declare a function through which we can access the private data member of the class. In this example I mentioned both of the methods to access a private data member and public data member in a structure.
#include<iostream>
#include<conio.h>
using namespace std;
struct A
{
class
test
{
private:
int
number;
public:
int
number1;
int
function(int);
};
test num; // class object
int a;
};
int A::test::function(int p)
{
number=p;
return
number;
}
int main()
{
A str;
int
node;
node=str.num.function(22); // For accessing the private data member of the class
cout<<node;
str.num.number1=13; //
cout<<str.num.number1;
getch();
}
Tag :
C plus
Top 3 Websites For Blogger Templates
I recently started work on blogger. And a very first and tiresome work is to find templates on Google. I searched a lot on this. And now i have a very good collection of templates website and i hope that u'll definitely like it.
Tecwab:
This website having a lot of useful professional templates. You'll definitely like templates on this website.

http://www.tecwab.com/2013/04/Best-Professional-Blogger-Template-free.html
------------------------------------------------------------------------------------------------
Blogger Template:
This website a good platform for beginners. Because all the templates which are available on this site are very beautiful and easy to implement on blogger. Every type of template are available here e.g technologies, education, games, sports, business, etc.


Tecwab:
This website having a lot of useful professional templates. You'll definitely like templates on this website.
http://www.tecwab.com/2013/04/Best-Professional-Blogger-Template-free.html
------------------------------------------------------------------------------------------------
Blogger Template:
This website a good platform for beginners. Because all the templates which are available on this site are very beautiful and easy to implement on blogger. Every type of template are available here e.g technologies, education, games, sports, business, etc.
-----------------------------------------------------------------------------------------------
This website is also provides a good templates for al kind of people.
-------------------------------------------------------------------------------------------------
Tag :
Blogger
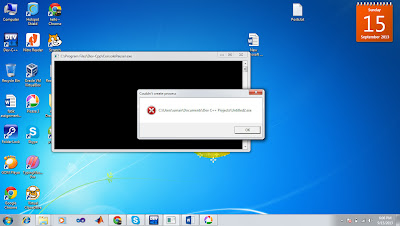
Couldn't Create Process in Dev C++
It's a normal error, which oftenly accur when u install a Dev c++ on your computer. This error is is normally occur to run dev c++ on 32 bit window instead of 64 bit configuration.
Solution:
To remove this error,
1. Go to your dev c++ tools,
2. Select Compiler option.
3. And then select "compile set to configure" and then select 32 Bit configuration.

Tag :
C plus
